Managing your Gmail emails on any other email clients is easy now. Yes, you heard it right. Just enable IMAP in your Gmail, configure it on your email client, and that’s it you can access and manage your Gmail messages from any device effortlessly.
But how to do it the right way? In this blog, we’ve covered everything from activating IMAP to its configuration process to troubleshooting tips. Do check
What Is IMAP In Gmail?
IMAP stands for Internet Message Access Protocol. IMAP is an updated version of the POP3 email system. IMAP allows you to read and access your Gmail emails from other email clients like Microsoft Outlook, Apple Mail, or Mozilla Thunderbird.
With IMAP enabled, you can:
- View your Gmail emails on any device.
- Keep your emails on Gmail’s servers.
- Manage (delete, move, and organize) your emails from anywhere.
How To Enable IMAP In Gmail
Starting from June 2024, Gmail automatically enables IMAP access, so there’s no need for you to activate it manually. Your emails will be synced with other email clients that you configure to use IMAP, allowing for seamless integration.
However, here’s how to manually enable IMAP in Gmail.
- Open your Gmail account.
- Click the “Settings gear” in the top right corner.

- Select “See all settings.”

- Navigate to the “Forwarding and POP/IMAP” tab.

- Look for the “IMAP Access” section.

- Check the box “Enable IMAP,” if it’s not already checked.

- Tap “Save Changes.”

- Choose “Continue” from the pop-up window to complete the verification process.

This verification process adds an extra layer of security to your account. Enter the prompted details like phone number (or) email ID (or) passcode key to complete the process.

How To Setup Gmail With IMAP
After activating IMAP on your Gmail account, you can configure it on your email client easily. There are two ways to set up your Gmail account: automatically or manually. Below, we’ve covered both of these methods.
Configuring Your Gmail Account Automatically
Adding a Gmail account to Outlook can be done in two different ways, depending on your Outlook version.
Follow these steps to configure Outlook on Windows 2016, 2019, etc.
- Open Outlook on your desktop.
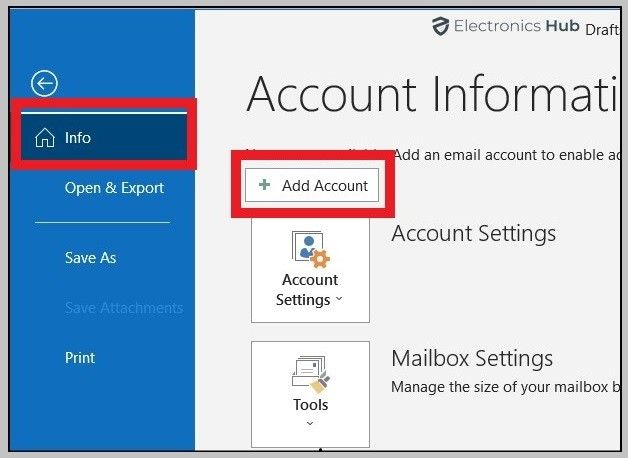
- Click on “File.”

- Select “Add Account.”
- Enter your Gmail email address and click “Connect.”

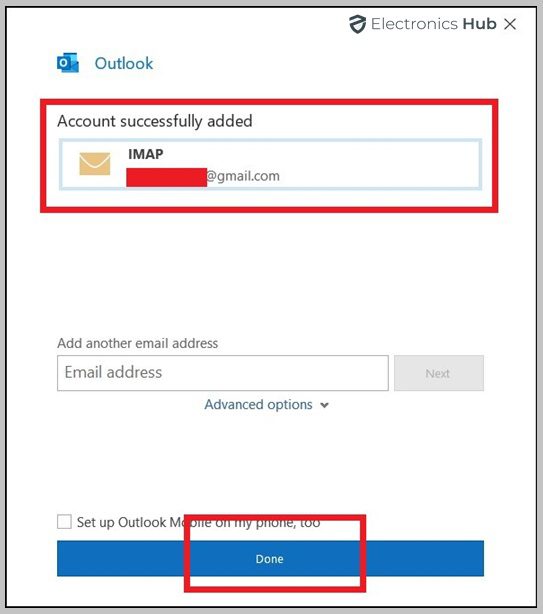
Now Outlook will try to automatically configure your account. If successful, you’ll be prompted to enter your password and may need to go through two-factor authentication if enabled.
- 5. Hit “Done.”
If you use the latest Outlook version, follow these steps.
- Open Outlook and click on your profile picture in the top right corner.

- Select “Add Account.”
- Enter your Gmail email address and click “Connect.”
Outlook will launch a sign-in window for your Google account. Enter your password and go through two-factor authentication if enabled.
- Tap on “Allow” to grant permissions. Once finished, Outlook will display your Gmail account.
Configuring Your Gmail Account Manually
If automatic setup isn’t successful, you can manually add your Gmail account using IMAP settings. Here are the steps you need to follow:
- Open Outlook and click “File.”
- Select “Add Account.”
- Enter your email ID.
- Choose “Manual setup” from the advanced options.

- Tap on “Connect.”
- Select “IMAP.”

- Enter the following details to complete the process.
Gmail IMAP Settings For Incoming Emails
- Incoming mail server: gmail.com
- Incoming port: 993
- IMAP TLS/SSL required: Yes
- Username: Your full Gmail address
- Password: Your Gmail password
- If you don’t have 2-factor authentication enabled, use your regular Gmail password.
- If you do have 2-factor authentication enabled, you’ll need an App Password.

Gmail SMTP Settings For Outgoing Emails
- Outgoing server address: gmail.com
- SMTP port (TLS): 587 (This port uses TLS encryption for added security)
- SMTP port (SSL): 465 (This port uses SSL encryption)
- SMTP TLS/SSL required: Yes
- Username: Your full Gmail address
- Password: Your Gmail password

- Look for the “Test Account Settings” button and click on it.
- Hit “Done” at the end
Troubleshooting Tips
Here are some troubleshooting tips when setting up IMAP:
- Ensure you’ve entered the correct IMAP server address, port number, username (full Gmail address), and password (or app password for 2-factor authentication).
- If you encounter any login errors, double-check that your password or app password is valid.
- Check if your email client or ISP requires specific security settings like SSL/TLS encryption.
- In rare cases, firewalls might block IMAP connections. Try temporarily disabling your firewall to test.
- Refer to your email client’s documentation for specific troubleshooting steps related to IMAP setup.
FAQs:
Gmail can be accessed with both IMAP and POP3 protocols. IMAP is generally preferred as it keeps your emails on Gmail’s servers and allows access from multiple devices with real-time syncing. POP3 downloads emails to your device and doesn’t sync across devices.
There isn’t a separate IMAP password for Gmail. You’ll use your regular Gmail password unless you have 2-factor authentication enabled.
You don’t need to find it! IMAP access in Gmail is automatically enabled. To use Gmail with another email client, configure it with: imap.gmail.com port 993.
Conclusion
Finally, now you can manage your emails from the comfort of your favorite email client without relying on the web interface. Remember, IMAP keeps your emails synced across devices, so you’ll never miss anything.
But what if you hit a snag? No worries! This guide is here to help you troubleshoot common issues. And if you ever need a refresher, just bookmark this post. It will come to your rescue whenever you encounter any unexpected challenges with IMAP.
